
E23 | First Period Gambrel | Factory Built
Season 44 Episode 23 | 23m 42sVideo has Closed Captions
The old barn is replaced with a new boathouse built in a factory and assembled onsite.
The project is halfway through construction. A closet is built in the original gambrel bedroom, and a water harvesting system is installed in the yard. The homeowner tours a handmade lighting factory. A gas boiler is vented to mimic a plumbing vent stack pipe. The old barn is replaced with a new boathouse built in a factory and assembled onsite in a day. Shrubs are protected for future planting.
Problems with Closed Captions? Closed Captioning Feedback
Problems with Closed Captions? Closed Captioning Feedback
Funding for THIS OLD HOUSE is provided by The Home Depot and Renewal By Andersen.
Support provided by:

E23 | First Period Gambrel | Factory Built
Season 44 Episode 23 | 23m 42sVideo has Closed Captions
The project is halfway through construction. A closet is built in the original gambrel bedroom, and a water harvesting system is installed in the yard. The homeowner tours a handmade lighting factory. A gas boiler is vented to mimic a plumbing vent stack pipe. The old barn is replaced with a new boathouse built in a factory and assembled onsite in a day. Shrubs are protected for future planting.
Problems with Closed Captions? Closed Captioning Feedback
How to Watch This Old House
This Old House is available to stream on pbs.org and the free PBS App, available on iPhone, Apple TV, Android TV, Android smartphones, Amazon Fire TV, Amazon Fire Tablet, Roku, Samsung Smart TV, and Vizio.
Keep Exploring

This Old House Insider Newsletter
Get This Old House exclusive stories, tips, and behind-the-scenes information delivered right to your inbox every month.Providing Support for PBS.org
Learn Moreabout PBS online sponsorshipKevin: Today on "This Old House"...
These beautiful lanterns are made right here in New England the old-fashioned way -- by hand.
Jenn: With water restrictions here in Ipswich, we've got to figure out a way to collect rainwater.
Tom: This house has taken 10 months to renovate.
The boathouse?
One day and it's up.
♪♪ Man: Got it?
♪♪ Man #2: Ah, that's it.
♪♪ ♪♪ ♪♪ Kevin: Hey there.
I'm Kevin O'Connor.
And welcome back to "This Old House" and to our first period home here in Ipswich, Massachusetts.
We are more than halfway through, so you can see there's a lot of great progress here on the exterior.
The homeowners have decided on this for the final color of our eastern white pine clapboards.
Windows are in as well, and the downspouts are actually tied into a hard-pipe system, which you can see has been trenched for because this is part of a rain-harvesting system that Jenn's going to talk about in a little bit.
The back of the house is a two-story addition.
And down here on the first floor, we've got a two-bay garage, radiant heat in the concrete slab right here.
And you can see the mechanicals, the plumbing and electric.
They are all installed.
And in this part of the house, the inspector has signed off on it, which means that they're ready to start adding the insulation.
The exterior walls are getting a closed cell foam insulation.
Interior walls, however, are getting a mineral wool, which is great for sound deadening.
Now, the entire second story up here is a primary suite, including a big closet, a laundry room and a plumber.
Hey, Brian.
Brian: Hey, Kev.
Kevin: So people love laundries upstairs, but of course, you guys hate them because if there's a flood, everything gets ruined down below.
You got a solution?
Brian: We do.
So instead of putting the typical safe pan in, we've decided to build a curb, waterproof the curb, put in a couple electric valves that if there was to be a leak in the system, it sits in the pan and shuts both valves off immediately.
Kevin: I love it.
Alright.
Thank you.
And so at the end of the hall, we've got a generous primary bedroom here, a wall of windows, 12 1/2-foot-high ceilings, and adjacent to a very spacious primary bathroom.
Love this space, Charlie.
Charlie: Nice size, huh?
Kevin: Great size.
Tub over there.
Shower over here.
Although some changes came your way midway through?
Charlie: Yeah, well, we had all the heat down.
Built the wall just right here.
The old one.
Homeowners saw it, did not like it.
Way too bulky.
Kevin: So this is tile down here, I presume, with glass up top?
Charlie: That's right.
Kevin: And that was too much for them.
Charlie: This corner was way too much into the bathroom.
So what we did was, easy solution, cut a hole in the floor, extended the framing on this half wall, which will actually get screwed and bolted into the floor joist below.
Kevin: And so again, you're thinking tile here, glass up here?
Charlie: That's right.
This time the glass will extend past where the wall was and have a mitered corner of glass right down to the floor where the curb is.
Kevin: Same square footage.
But now you can kind of visually see through that corner right there, and that makes all the difference.
Charlie: What do you think?
Kevin: It works for me if it works for the homeowners.
Does it work for you, getting something like that midway through when, like you say, the heat's already down?
Charlie: Believe it or not, not a big deal.
Homeowners should always feel comfortable in saying something.
I mean, big deal.
You work around the heat, cut a hole in the floor, build a new wall.
Kevin: That's why you're who you are.
Thank you, Charlie.
Alright.
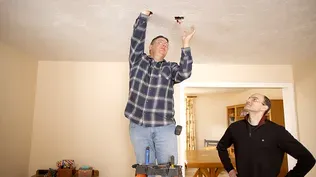
This room becomes Bill's home office, complete with a new Rumford fireplace, compliments of Mark and his guys.
They fixed the chimney and they even installed new clay liners going right up through here and the chimney, which runs through the second floor guest bedroom where Tommy's working.
Hey, Tommy.
Tom: Hey, Kevin.
How are ya?
Kevin: Alright.
Boy, there is no mistaking when you get into the original part of this house, man.
It is just one of a kind.
Tom: Yeah, it's small and it's tight.
Kevin: Yeah.
So, guest bedroom, right?
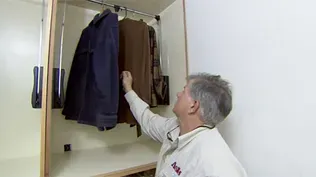
And the homeowners asked for a closet, which looks like you are sort of underway.
Although I know Mark had tuned up our chimney.
So this is working again?
Tom: Yeah.
Nice new fireplace downstairs with a new chimney liner.
And you're right.
This is a small bedroom, and bedrooms, nice to have a closet in it.
So we decided to put a little closet here.
And rather than make a 24-inch-deep closet, we made it an 18-inch-deep closet.
And I even took the 2x4s and made them 2x3s.
Kevin: Wow.
Every inch count.
Tom: Every inch counts.
Right.
So we'll have a door in the center.
When you open the door to the left, you can have a clothes pole up here and another one down here.
Or you could put shelves and a clothes pole either direction, another clothes pole here so you can hang clothes a little lower.
Kevin: To hang this way, normally we would have needed 24, so that's why -- Tom: Right.
Kevin: Oh, I got you.
Tom: In the old houses, they didn't have deep closets.
So lots of times there were just clothing hung on hooks.
Kevin: Gotcha.
So I see the two-bys in place.
You have stopped them before the chimney.
I presume this is a code issue.
Tom: It is definitely a code issue.
You can't have any combustibles -- wood -- closer than two inches to a chimney or a fireplace.
So we're going to use a stud wall out of steel.
And that will allow us to put this stud wall tight to the chimney.
So I was about to bang it in.
♪♪ That should be it.
Now you can get those two screws in.
♪♪ ♪♪ ♪♪ Kevin: Okay.
That's right there.
Tom: Nice going there, sonny.
Alright, so we got our two steel walls on each side, which is going to give us plenty of space, that 2-inch clearance that we need.
But look right here on the front.
We can run our wallboard right across the front.
We haven't ate up any space except for the thickness of the wallboard.
Kevin: So can you put wallboard this close to the chimney?
Tom: Yeah, fire-rated.
But we want to make sure that this is 5/8 for two reasons.
First of all, it gives us the fire rating we need and plus we're more than 16 inches for these studs.
And 5/8 is okay for spanning up to 2 feet.
Kevin: Beautiful.
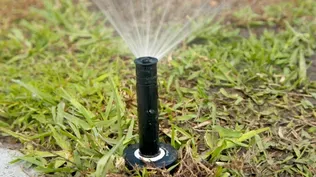
♪♪ Jenn: Over the last several years, rainfall has been below average here and the reservoirs have been dipping.
The town of Ipswich has declared a severe drought and they've also placed a mandatory water ban.
So you can't irrigate your landscape.
So we have to figure out a way to provide water to the landscape without using town water.
A lot of planning has gone into the solution by civil engineer John Morin.
Hey, John.
John: Hey, Jenn.
Jenn: Nice to see you again.
John: Good to see you.
Jenn: Great.
So let's talk about drainage on the entire site.
I mean, when we have a river or a body of water, that means conservation commission and wetlands usually.
Right?
John: Correct.
With the Ipswich River, the jurisdiction for the Conservation Commission is pretty much the entire site.
Jenn: Right.
John: So one of the big things is dealing with the additional runoff from the additional roof areas as part of the project.
Jenn: Right.
John: In order to do that, we're proposing a roof recharge system to deal with that runoff.
Jenn: Right.
Because it can't just all sheet off into the river, right?
John: Exactly.
Jenn: Okay.
John: So we're going to be capturing the roof runoff from different portions of the structure and directing them to the different cisterns and to the roof recharge area.
Jenn: Okay.
John: The gutter systems for the cisterns will be capturing the roof runoff along this edge to the cistern, capturing the roof runoff here into this cistern.
Jenn: Mm-hmm.
John: The other cistern is going to capture the roof runoff in the front.
It's going to direct all the way down to the cistern down by the boathouse.
Jenn: Okay.
John: And then the roof runoff from the boathouse will be tied into the cistern.
Jenn: Okay.
And each of these are 2,500 gallons.
John: Correct.
Jenn: So the homeowners could use the water in the cisterns to irrigate their landscape?
John: That's correct.
Jenn: Okay.
John: And then we've got the recharge system, which is really part of the regulations.
Jenn: So a recharge just basically means send the water back into the Earth.
John: That's correct.
Jenn: Okay.
John: So this recharge area is going to capture all of that roof with a gutter system that will direct to one side.
And then a gutter system that will direct to the other side.
Jenn: Okay, let's go down there and see how this is all going to play out.
John: Sounds good.
As you can see here, they started to install the drainage for the recharge system.
Jenn: Okay.
John: This pipe is going to capture the gutters from up top.
That'll get directed over to the recharge system out in the back that hasn't been installed yet.
Jenn: Okay.
John: And the pipe that you see here is directing the runoff from the roof out front that we're capturing and is going to be directed to the cistern down by the boathouse.
Jenn: Wow.
Let's go see where this line goes.
So I understand this cistern was delivered by crane and set in place yesterday?
John: Exactly.
So this is one of the 2,500-gallon cisterns, two-compartment tank.
There's a baffle wall separating the two compartments, provides additional filtration from one compartment to the other.
And then there'll be a pump in the second compartment.
Jenn: And that's where the homeowners could hook up their hose to irrigate their landscape?
John: Exactly.
Jenn: Excellent.
Well, overall, I think this plan really works well for this site.
I mean, it's water conservation.
You have a sustainable landscape and you're protecting the wetlands and riverway.
John: Exactly.
Jenn: So, awesome.
Well done.
I want to show you a few things about the native plants we're putting in over here.
Kevin: It's time to order light fixtures for the house.
So I'm off to meet homeowner Helen and get a tour of a shop where they make lanterns, chandeliers and other light fixtures by hand.
Look at these.
These are gorgeous, huh?
Helen: Beautiful.
Beautiful finishes.
Kevin: Oh, yeah.
Helen: Hand-blown glass and the onion lights.
And for our house, we picked these more modest colonial.
Kevin: Perfect.
Hey, Dusty.
Dusty: Kevin, How are you?
Helen: Hi.
Dusty: Helen.
Welcome to the shop.
Kevin: Thank you.
We were just admiring your handiwork here.
Dusty: Oh, thank you very much.
I understand you ordered a chandelier for your dining room table?
Helen: Yes.
Dusty: Do you want to see us making it right now?
Helen: Yes.
Dusty: Alright.
Let's go take a tour.
Kevin: Alright.
Dusty: Here you can see where we're headed with your chandelier.
Kevin: Good taste, Helen.
Helen: Beautiful.
Kevin: Yeah.
Helen: I've only seen it online.
Dusty: It's one of my favorites.
It consists of a bunch of different parts.
We have the hub up here that flows into the main stem here where all the arms are bundled together and wrapped with a decorative wire wrapping that flows into the graceful bottom curl and ends in a decorative hook on the end.
Kevin: Cool.
Dusty: The first step is building this decorative hook.
Do you want to go see how we do that?
Helen: Yeah.
Dusty: Here we are in the fabrication department where we're going -- where we're going to be building the chandelier arms themselves.
And he's going to start by hammering the end flat.
So once we start the flattening out the hook with the hammer, we can then put it in the roller and flatten it out even further so that it forms that hook on the end of the chandelier arm that's decorative that probably made you choose the chandelier.
Kevin: So the chandelier has how many arms?
Dusty: Eight.
Kevin: Look at that, huh?
Helen: Beautiful.
Dusty: So here, Mike's going to form the bottom curl and he's going to bend it around the circle by hand, and he's matching it up to the pattern that we have here.
So you get a nice, even, consistent chandelier.
So once we have the arms formed in the fabrication department, we can come over to the soldering department and we can see Mike solder the bobeche to each arm.
Kevin: What makes a perfect joint?
Dusty: Well, there's four things -- flux, solder, heat and experience.
Kevin: [ Laughs ] Dusty: And he's going to cool it down a little bit.
Kevin: That's just water there?
Dusty: That's just water.
Yep.
Kevin: Look at that.
That is a nice little bead right there.
Dusty: Yes.
Kevin: That is terrific.
♪♪ ♪♪ Dusty: Now we're going to apply the finish to it.
We have a four-step process.
The first step, we put it in a cleaning bath to remove flux residues, oils, greases, anything that was part of the production process prior to this.
And then it goes into an acid etch bath, which prepares it further for the coloring agent.
And then it's on to the final step where we'll see the finish applied.
Kevin: And what finish did we decide on?
Dusty: Helen chose the dark antique brass, which is going to match the hardware in your house and it's going to look fantastic.
Kevin: Cool.
You get the benefit of the handmade, right?
Every single piece is unique and it's just slightly different.
Dusty: And the other unique thing about it is it's a living finish.
It's not lacquer-coated.
Kevin: Meaning what?
Dusty: Meaning it's going to age and patina over time.
Kevin: How are you feeling about your color choice now that you're seeing it come together, Helen?
Helen: I think it's lovely.
Dusty: So here you can see Madison is preparing to wire one just like yours.
We let them dry overnight after they go through the finishing process.
And here she is.
She's installing the light socket.
Every one of these is made to order.
We can turn these around in about three weeks.
Kevin: What do you think, Helen?
I mean, this is getting close to the finish line.
Helen: I think it's beautiful.
It's been great to see it made here.
I feel so connected to it.
Kevin: Yeah, right?
Helen: And thank you so much for having us here.
Dusty: Thank you for coming.
♪♪ Kevin: Over the past 300 years, this property had additional buildings with multiple uses -- workshop, stable, nursery -- and historic photos show that there was also a barn somewhere right about down there.
Well, that barn is long gone.
A second small barn was built right in about here to house goats and chickens.
And when Bill and Helen, our homeowners, bought the property, well, the barn was in really bad shape, so Charlie and his crew took it down.
Homeowner Bill couldn't resist the chance to help.
Bill: Oh, you didn't tell me anything about the foot pedal.
Man: That just moves you back and forth.
You don't even have to worry about that.
♪♪ ♪♪ [ Laughter ] Bill: Okay, that was fun.
Kevin: The homeowners would like a place to store some kayaks, a small boat and to house some guests.
So they decided to build a colonial-style barn/boathouse with a guest suite right here.
And I'm told it's going to be framed up by the end of today.
Hey, Everett.
Nice to meet you.
Everett: Kevin, nice to meet you as well.
Kevin: A hat's a really good idea.
It's cold out here.
Everett: Cold day.
Kevin: But we're not going to be out here for that long, right?
Everett: No.
Today we're going to be assembling a barn/boathouse.
Should only take us one day to complete.
Kevin: Assembled here but you guys actually put together somewhere else?
You guys have got a factory?
Everett: Yes.
We're penalizing all the wall panels, the roof trusses ahead of time at our facility and we're going to put it up today.
Just take one day to complete.
Kevin: Nice.
You guys have been at it for a while?
Everett: Yes, 34 years in business.
We build barns, garages, sheds all over New England.
Kevin: That's awesome.
Well, you got the crane and the crew on site ready to go.
Everett: Yes, we are ready to go.
♪♪ Kevin: So what is the process?
Let's talk about this wall right here.
That's 2x6, right?
Everett: That's a 2x6 wall.
We frame the walls all in one section.
You can see all the headers over the doors and windows, all premium lumber.
So we're going to start setting this wall on the roadside first.
And the next step is to start setting the other three wall panels and get all of them in place and then straightened out.
♪♪ Kevin: So tell me about the efficiencies of being able to assemble under controlled conditions.
Everett: Well, we assemble the wall panels in the shop and the advantages are there's very little waste.
And in fact, all the little waste we have, we turn into timber pots and we sell them.
People burn them in their woodstove or fireplace.
So absolutely nothing goes in a landfill.
Kevin: And so it ends up being efficient in terms of you guys' construction, cost savings as well?
Everett: Yeah, the cost savings very efficient.
And then we're able to pass the cost savings on to the customer.
Kevin: And is your crew in the shop, are they working up on tables with jigs and stuff or are they working down on the floor?
Where are they building that?
Everett: The neat thing, Kevin, is we build the wall panels right on the delivery trailer that came out to the job site.
Kevin: Of course you do.
Clever.
Everett: Makes it pretty nice.
Kevin: That is awesome.
♪♪ This is the part I was waiting for, when you start putting this roof structure up.
What am I looking at here?
Everett: So right now, Kevin, we have the gable-end trusses already pre-built, the one-foot overhangs on the windows installed, so we're ready to put that gable on.
♪♪ And once that's done, we're going to start working the rest of the roof trusses down the building and come to the front gable, and the whole building will be up and standing.
Kevin: That crane really flies them in fast, doesn't it?
Everett: Oh, that was amazing.
All the trusses in place in just a matter of an hour.
Kevin: All right, well, I'm going to let you guys finish up here.
I'll check back with you in a little bit.
Everett: Sounds great.
Kevin: All right.
Thank you.
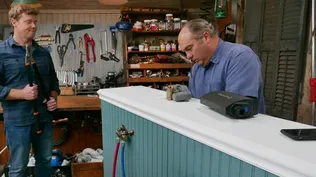
♪♪ Richard: As we've talked about before, this little gem of a building hasn't been that easy to do mechanically.
You know, there's no real lateral way to run ductwork, and there's windows everywhere.
So for the heating and air conditioning, we use this mini duct system right here to deliver conditioned air.
So that'll give us heating and cooling, but we still needed it to make domestic hot water for faucets.
And we realized that there were places in this building that just screamed for radiant floor heating -- here in this garage that's underneath the primary suite upstairs, and underneath my feet is that finished basement that was perfect for radiant.
That meant we needed to have a gas-fired combination boiler.
Now, the only place to put a boiler in this building, it turns out, was right underneath my feet.
A gas appliance has to be vented.
So here in the front of the house, right behind this wall and down below is where the boiler is.
So there are clear rules about where you can vent in relation to operable windows.
Can't be within three feet.
So nowhere along here can we do it.
So maybe you could do it here, but what are you going to do?
Are you going to take a piece of plastic vent piping and leave it right here on the front of this beautiful building?
We figured there's just got to be a better way.
So we put our heads together and we had a meeting, and I think it was Brian Bilo, our plumbing contractor, that came up with the idea to take from our boiler the vent pipe and actually lose it right inside this wall right here and go up inside the wall and then turn.
And now it can go at the angle of the roof right here.
And in an ideal world, we'd be able to get right out through the far side of the building.
But the steel pipe got in the way.
But look at that.
When it's done, it's going to look like a plumbing vent stack pipe.
And that looks traditional.
Charlie: All set.
Richard: A little bit of black paint will hide that aluminum flange, and that vent will disappear.
Nicely done.
♪♪ ♪♪ Jenn: Fred: Hey, Fred.
Hey, Jenn.
Jenn: So I see the site is not ready to install the plants yet, but they've arrived, so I appreciate you heeling them in.
Fred: Yeah, we're just going to take these wood chips that were on site.
We're going to put a good six inches around them and on top of them to keep the roots from freezing.
Jenn: Right.
So the heeling-in process basically means it's going to protect and insulate the plants and protect the roots from freezing.
And then in the spring time, when they're ready to plant... Fred: Just take them out.
Jenn: Yep.
And they're going to be all protected.
So I see we have the Viburnum nudum Winterthur, the Little Henry Itea, and this one is an Amelanchier Autumn Brilliance.
And they're all native plants.
They're all going to bloom in the spring.
Their fall color and their leaves are going to be spectacular.
Fred: Yep.
And don't forget about the star of the show, the red maple.
Jenn: Oh, my gosh.
So this is a beautiful red maple.
Look at the crown on that.
I'm going to go locate a spot down by the boathouse.
Fred: Great.
Thank you.
♪♪ Kevin: Look at that, Tommy.
All the trusses in place.
Both gable ends.
Looks good, huh?
Tom: It looks great.
Kevin: Everett, so what's next for you guys?
Everett: So next step is put the sheathing on the roof, roofing, doors, windows, and siding.
Kevin: So, Tommy, if you had to do this on site, stick-built, how long for a well-oiled crew?
Tom: Well, first of all, if the weather's good.
Kevin: Rarely is.
Tom: We get the stock here, then we individually load, unload each piece, get it on a sawhorse, cut, and then put it all together, build the walls, and set the roof.
Ah, you know, to get it about where it is now but sheathed, probably three days.
Kevin: Three days versus half a day.
I guess that says it all.
Everett: Oh, very quick.
Charlie: So what do you think?
Richard: Instant building.
I love it.
That went up really quick.
Charlie: Really did.
Richard: And I'm glad we got ahead of it and we ran our water, our waste, and we got full electrical, because we have future heat pumps going in here.
Charlie: And not to mention a 2,500-gallon system behind it.
Jenn: And you know what?
I think equal distance between both of these houses, put that red maple right here.
It's going to be perfect.
Charlie: Beautiful.
Kevin: Sounds like a plan.
Everett, can't thank you and you guys enough for all the help.
Everett: Oh, we had a blast today.
And next up, it's the roof sheathing and getting the building weather-tight.
Kevin: Awesome.
Tom: And I can't wait to see all that finished siding on with the windows and the roofing.
It's going to look great.
Kevin: All right.
Well, that's next for today, but next week, our original roof boards from the original building -- well, they get a second life.
They're going to be part of the cathedral ceiling in the new L. So until then, I'm Kevin O'Connor.
Richard: I'm Richard Trethewey.
Charlie: I'm Charlie Silva.
Jenn: I'm Jenn Nawada.
Everett: I'm Everett Skinner.
Tom: And I'm Tom Silva.
Kevin: For "This Old House" here in Ipswich.
♪♪ ♪♪ Kevin: Next time on "This Old House"... Charlie saved the old exterior roof board so we can make a new interior ceiling.
Jenn: And winter weather doesn't stop us from hardscaping.
Man: We're going to put some cement behind the base stone to give this wall a little more integrity.
Tom: And today we're dealing with the ups and downs of riser heights.
♪♪


Support for PBS provided by:
Funding for THIS OLD HOUSE is provided by The Home Depot and Renewal By Andersen.